Installation Instructions - Downloads


In this post I'll show you how to install this application & how configure the computer for the application. 

To run this application we must have install the JRE(Java Runtime Environment) in our computer.And we must install the correct bit version as our operating system. Please see the below video to know , how to configure our computer for this application.


Download the application

You can download the application by clicking below link.Then it will redirect to the google drive folder.From there we can download the exe file.


Installation

Please see the below video for the installation process.


And you can download the Netbean projects of the main modules which I have used in this application by below download links.


Also you can download my other Netbeans projects by clicking below links. 


And you can download the Java resources from below link.


And last by below link you can download the latest Java Runtime Environment software.


40. Settings Import & Export


This is a new feature which added to the application. By using this feature we can export the settings of the existing application , including all the commands & all other settings & data. Also we can import the same settings & data of the old unistalled application. This settings import & export window is located in accessories window. And we can open it by clicking the highlighted icon as in the above image.


Export Settings

To export the existing settings of the applciation , we need to click the #1 ( Up Arrow ) Icon. Then it will open a window to select a location to backup the setting files. After we select the location it will backup all the setting files in folder named as "H.B.S.N Backup".


Import Settings 

To import the settings of the old applciation , we need to click the #2 ( Down Arrow ) Icon. Then it will open a window to select the folder of the backuped setting files. After we select the "H.B.S.N Backup" folder it will import all the setting files which are in the backup folder . Then to get affected , we need to restart the application.


39. Update Receiver


This is the latest feature which added in the application. Now you are getting the notifications of new releases. Whenever It released a new updated version it will notify by a icon as in above highlighted spot in above image. To download the latest version , what we need to do is click the icon & It will open the download page.


38. Movie Organizer


In this post I'll show you about the movie organizer & how it works. This application is similar to mp3 organizer. This application is a supporting application to the video gallery. 

Movie Organizer is located in the quick launch panel as following image. 


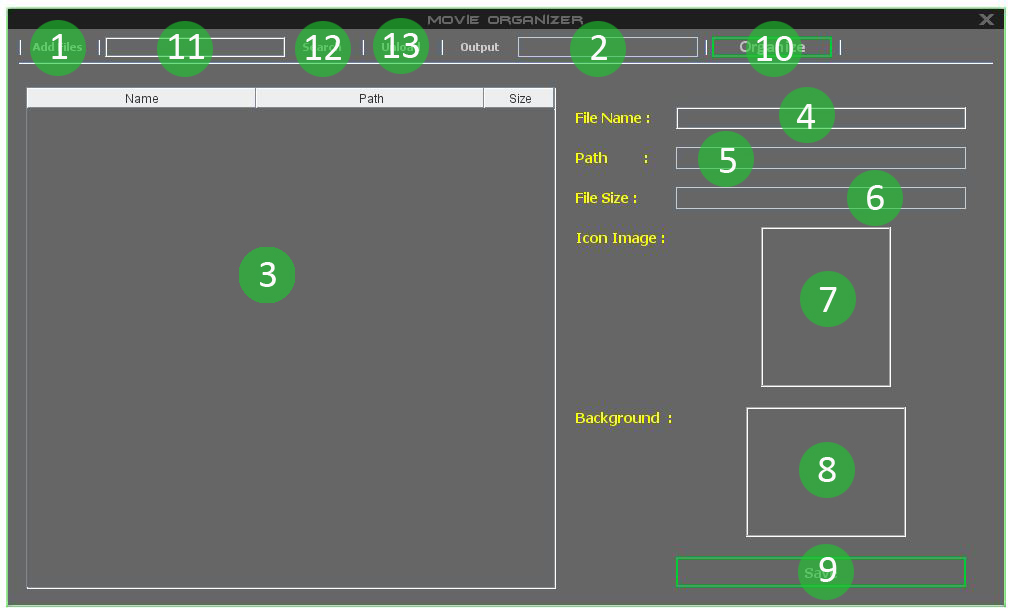
I'll describe you about the tag editor by number vise as following image.
1.Adding files to the database
By clicking this button , we can add files / folders to the database.Then it will add all the files to the database , from the location which we selected.
 
2.Select output location
By clicking this button , we can select a location to save all the organized movies.

3.File List
In here it will show all the files which we have added to the database. We can do the editing by clicking the record from this list . And the editing can do only to the movie files ( .avi , .mp4 , .wmv , .mov , .mkv , .mpeg file formats)
4.File Name
It will show the name of the movie , which we have selected from the list.This field is editable so we can edit the name of the selected movie file. 

5.File Path
It will show the path of the movie , which we have selected from the list.
6.File Size
It will show the size of the movie , which we have selected from the list.This field is editable so we can edit the name of the selected movie file.
7.Movie Icon - ( Video Gallery)
By clicking this field , we can select an image as an icon for the movie.
8.Movie Background - ( Video Gallery)
By clicking this field , we can select an image as the background for the movie. 
9.Save Button
After do all the editing (4) & selecting the images (7) , (8) , we can save the record by clicking this button.

10.Organize Button
After save all the editing for the movie files , we can organize them into output location by clicking this button.

11.Search Files
To search records from the list , we need to type the full or half phrase of the file which we need to find.
12.Search Button
After we type the phrase of the file which we need to find , we need to click this button to retrieve the result.Then it will show all the record in the list , which contains the typed phrase.
13.Unload Button
By clicking this button , we can unload all the data from the database.
Below video will show how to do the movie organizing.