37.Authentication - Upgrade


In this post I'll show you about the upgraded authentication window.


In previous posts , the authentication window for the folder locker & the message encryption window , as like above image.But now it has upgraded into newer version as below image.


In this version , it uses only 4 digit password.Also the window appearance is same as apple's pass-code entry  window.And this version will make it easy for the password entry.


In next post I'll update you about next new function which I added to the system. 

35.Home Automation - 09


In this post I'll show you how to make the sensor unit of the home automation system.


This unit is use to switch on/off the lights of the selected places(rooms). What this unit does is , it senses the movements by the attached PIR sensors.According to those movements , it sends signals to the main control unit for the switch on/off the lights.We can attach 7 sensors to this unit.

To make this unit we will need below parts list.

  • Arduino Nano module - 1
  • NRF24L01 RF module - 1
  • PIR sensors - 7
  • Prototyping board - 1
  • Led
  • Wires
  • Soldering Iron 

I have describe about the Arduino & RF module in previous posts.Now I'll describe about the PIR sensors.

PIR Sensor (passive infrared sensor)

A PIR-based motion detector is used to sense movement of people, animals, or other objects.As per the detection it sends signals as an output.This module works with 5v power connection. 

Now I'll show you how to assemble the sensor unit.As above image we need to connect the modules.The connections should be as below.

  • Arduino Nano VIN pin to +5V power connection
  • Arduino Nano GND pin to -5V power connection
  • NRF24L01 MISO pin with Arduino Nano D12 pin
  • NRF24L01 SCK pin with Arduino Nano D13 pin
  • NRF24L01 CE pin with Arduino Nano D9 pin
  • NRF24L01 MOSI pin with  Arduino Nano D11 pin
  • NRF24L01 CSN pin with Arduino Nano D10 pin 
Then PIR sensor connections should be like , 

  • All the PIR sensor DATA pins with Arduino Nano D2 up to D8 
  • All the PIR sensor VCC pins with Arduino Nano VCC pin
  • All the PIR sensor GND pins with Arduino Nano GND pin

After we made all the connection correctly , we have to upload the Sensor_Unit.ino file to the Arduino Nano using Arduino IDE. 

In next post I'll update you about next new function which I added to the system.

34.Home Automation - 08


In this post I'll show you how to assemble the main control unit of the wireless home automation system.


In this unit , we can connect 8 electronic devices which can control by the speech recognition system & 8 lights which controls by the sensor unit.It needs 5v , 2A power supply to operate this unit.We need to assemble all this modules on a prototyping board.And we need to use female headers to fix the modules to the prototyping board.If you preferred to make your ow printed circuit board it is better.All the module connection should be as below.

  • ESP8622 TX pin with Arduino Nano D2 pin
  • ESP8622 RX pin with Arduino Nano D3 pin
  • dc-dc converter +VOUT pin with ESP8622 VCC pin & CH_PD pin & I2C OLED display VCC pin & NRF24L01 VCC pin
  • dc-dc converter -VOUT pin with ESP8622 GND pin & I2C OLED display GND pin & NRF24L01 GND pin
  • I2C OLED display SCL pin with Arduino Nano A5 pin
  • I2C OLED display SDA pin with Arduino Nano A4 pin
  • NRF24L01 MISO pin with Arduino Nano D12 pin
  • NRF24L01 SCK pin with Arduino Nano D13 pin
  • NRF24L01 CE pin with Arduino Nano D9 pin
  • NRF24L01 MOSI pin with  Arduino Nano D11 pin
  • NRF24L01 CSN pin with Arduino Nano D10 pin

Now the connections for the shift registers with the Arduino module & the relay modules.In the above image left side shift register is the primary register & the other shift register is the secondary register.Same for the relay modules.

  • primary shift register DS(14) pin with Arduino Nano D4 pin
  • primary shift register OE(13) pin with Arduino Nano GND pin
  • primary shift register ST_CP(12) pin with Arduino Nano D5 pin
  • primary shift register SH_CP(11) pin with Arduino Nano D6 pin
  • primary shift register MR(10) pin with Arduino Nano VIN pin
  • primary shift register VCC(16) pin with Arduino Nano VIN pin
  • primary shift register DOUT(9) pin with secondary shift register DS(14) pin
  • secondary shift register OE(13) pin with Arduino Nano GND pin
  • secondary shift register ST_CP(12) pin with Arduino Nano D5 pin
  • secondary shift register SH_CP(11) pin with Arduino Nano D6 pin
  • secondary shift register MR(10) pin with Arduino Nano VIN pin
  • secondary shift register VCC(16) pin with Arduino Nano VIN pin
  • primary shift register Q0(15) pin with primary relay module IN1 pin
  • primary shift register Q1(1) pin with primary relay module IN2 pin
  • primary shift register Q2(2) pin with primary relay module IN3 pin
  • primary shift register Q3(3) pin with primary relay module IN4 pin
  • primary shift register Q4(4) pin with primary relay module IN5 pin
  • primary shift register Q5(5) pin with primary relay module IN6 pin
  • primary shift register Q6(6) pin with primary relay module IN7 pin
  • primary shift register Q7(7) pin with primary relay module IN8 pin
  • secondary shift register Q0(15) pin with secondary relay module IN1 pin
  • secondary shift register Q1(1) pin with secondary relay module IN2 pin
  • secondary shift register Q2(2) pin with secondary relay module IN3 pin
  • secondary shift register Q3(3) pin with secondary relay module IN4 pin
  • secondary shift register Q4(4) pin with secondary relay module IN5 pin
  • secondary shift register Q5(5) pin with secondary relay module IN6 pin
  • secondary shift register Q6(6) pin with secondary relay module IN7 pin
  • secondary shift register Q7(7) pin with secondary relay module IN8 pin
  • primary relay module VCC pin to Arduino Nano VIN pin
  • primary relay module GND pin to Arduino Nano GND pin
  • secondary relay module VCC pin to Arduino Nano VIN pin
  • secondary relay module GND pin to Arduino Nano GND pin
  • Arduino Nano VIN pin to +5V power connection
  • Arduino Nano GND pin to -5V power connection
        
After we make all the connections as above , the control unit is done.Now we can upload the control_unit.ino file to the Arduino Nano board & power up the unit.

In next post I'll show you how to make the sensor unit.


33.Home Automation - 07


In this post I'll show you about the shift registers.As the shift register I'm using here 74HC595 IC.


Basically shift registers are use to extend the amount of I/O channels.As above image , from a shift register we can send data to 8 units by using only 3 input pins.In here,

  • Q0 to Q7 pins are works as output pins
  • Need to connect 5V supply to the VCC pin & MR pin
  • Need to connect common power supply to the GND pin
  • DS , ST_CP , SH_CP needs to connect with the Arduino module

In next post I'll show you how to assemble the main control unit by using all these discussed modules.


32.Home Automation - 06


In this post I'll show you about the I2C OLED display.


This display is use to get the IP address of the control unit.This display comes in many different color combinations.And we need to connect 3.3v to VCC pin & common to the GND pin to operate this display.And we need to connect SDA & SCL pins with the arduino board.

In next post I'll show you about shift registers & how it works.
 

31.Home Automation - 05


In this post I'll show you about NRF24L01 RF module & how it works. 


This module we are using to connect the main control unit with the sensor unit.And receive & transmit the data within this two units.This is a powerful module & its data transmitting is accurate , also less garbage data transfers.The specialty in this module is , it is works as the receiver & transmitter both, So that's why it calls as transceiver.

This module has 8 pins & those are as above image.It needs 3.3v to work this module.And we need to connect all the pins with the Arduino board as mentioned in the image.

In next post I'll show you about the I2C OLED display & how it works.


30.Home Automation - 04


As mentioned in the previous post , in this post I'll show you how to upgrade the firmware of the ESP8622 wifi module.
To do this first we need to download the firmware.We can download the firmware from below link.


Then we need to connect the GPIO0 pin to the GND.
  Then open the downloaded flasher file. 


Then as above image,

  • Select the downloaded firmware by clicking the "Bin" button 
  • Type the port number
  • Upload the firmware to the module bu clicking the "Download" button 


After that you can see the data writing to the module by blinking blue color led in the module.

 Then the downloading will stop from the 99% , in that time we need to close the flasher & disconnect the GPIO0 pin from the GND.

Then open the Arduino IDE , and select the COM port.Then open the serial monitor and set the baud rate to 9600/115200.Then type the command as "AT+UART_DEF=9600,8,1,0,0" and hit the enter button.This will change the baud rate into 9600 of the module.


In next post I'll show how about NRF24L01 RF module.


29.Home Automation - 03


In this post I'll show you about the ESP8622 wi-fi module & how to configure the ESP8622 wifi module.In here we are using the esp-01 version.What this module does is connects the arduino module with the internet via wi-fi.Below is the pin output  diagram.

 
This module have 8 pins.But we are using only 5 pins for this project.And those are working as below, 

VCC
This is the power input for this module.And this module works with a 3.3v power.So we need to give a +3.3v to this pin.

GND
This is the ground input pin of this module.And we need to connect - power to this pin.

CH_PD
To activate this module , we need to connect a + 3.3v connection to this pin.

RXD
This is the data receiving line for this module.And this pin connects with the TX pin of the Arduino board.

TXD 
This is the data transmitting line for this module.And this pin connects with the RX pin of the Arduino board. 

To configure this module we should have ,

  • FTDI USB to Serial converter
  • 5v to 3.3v dc-dc converter
  • Jumper wires 

Now I'll show you how to wire this module with the FTDI module for configuration.
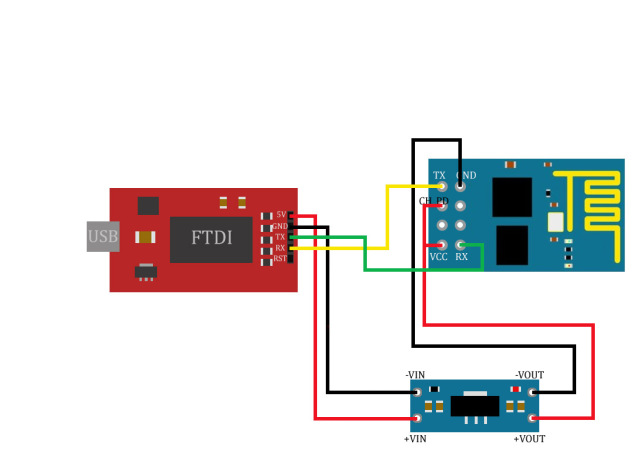
And the connection between the FTDI module & the ESP8622 should be as below,

  • FTDI Adapter +5V Pin to 5V to 3.3V DC to DC Converter +VIN Pin.
  • FTDI Adapter GND Pin to 5V to 3.3V DC to DC Converter -VIN Pin.
  • 5V to 3.3V DC to DC Converter +VOUT Pin to ESP8622 VCC Pin.
  • 5V to 3.3V DC to DC Converter -VOUT Pin to ESP8622 GND Pin.
  • 5V to 3.3V DC to DC Converter +VOUT Pin to ESP8622 CH_PD Pin.
  • FTDI Adapter RX Pin to ESP8622 TX Pin.
  • FTDI Adapter TX Pin to ESP8622 RX Pin

After we connect all the pins as above , we need to connect the FTDI module to the computer using a data cable.Then open the device manager in the computer.

Then under the ports , the FTDI module will show.And note down the COM port address ,in here it is COM4.

Then open the Arduino IDE.


Then go to Tools > Port , then select the port name which was showing in the device manager.And that is the FTDI module.

After that open the serial monitor of the Arduino IDE (Ctrl + Shift + m).


As following image we need to select the settings(In some modules baud rate comes as 9600 & in some it comes as 115200).

Then type as "AT" in the command field & hit enter.If the module is working good & the connections are correct , we should get a message as "OK". If not we have to check the pin connections & the selected COM port.After that send a command as "AT+GMR". Then it will show us the firmware version.


In my case , this module's firmware version is 001800902.If the module's firmware is below than 902 , we have to upgrade the firmware.

In next post I'll show you how to upgrade the ESP8622 module firmware.


28.Home Automation - 02


In this post I'll show you about the Arduino Nano board & what it does.


This is the brain of this control unit.As above image this module has 30 I/O pins.And to power up this module , we need to connect +5v power supply to the VIN(30) pin , and the ground power line to the GND(29) pin.In main control unit , all other modules are connected to this module and those all the modules will control by this Arduino board.To program this module , we have upload our arduino program to this board using Arduino IDE via a data cable.

To do that we need to follow below steps,

  • Connect the Arduino board to the computer
  • Open the arduino sketch(program)
  • Selecting the port(Tools > Ports)
  • Uploading the sketch to the board by clicking the upload button


In next post I'll show you about the ESP8622 wifi module.